Shrink Sleeve Defects: Wrinkles, Distortion, and Label Jams

A shrink sleeve fails in a small number of recognizable ways. It wrinkles, it lands in the wrong place, it will not feed, or too much heat damages something. What makes those failures difficult is not their variety but their shared symptoms. A wrinkle can be a placement problem or a shrink problem, and the two call for opposite responses. The line that ran clean all morning can start jamming because of a splice in a new roll.
A sleeving fault is best handled diagnostically rather than prescriptively. The aim is to define what an acceptable result looks like, name the cause groups behind the three defect families, and show what excess heat does to film and containers. It also sets the order in which to check things before anyone touches a setting. No temperatures, steam pressures, or conveyor speeds are given here. A number that suits one grade of PVC on one bottle at one line speed is meaningless for yours.
Written for packaging engineers, production managers, quality teams, and buyers running shrink-sleeve lines.
One disclosure: Tengzhuo builds the applicators and tunnels discussed here. Read every capability statement as a supplier’s claim attributed to a published page, and verify it against your own bottles, film, and line.
- A defect is a deviation from a written standard. Without an agreed tolerance and inspection condition, “wrinkle” is an opinion.
- Tell placement defects from shrink defects by marking the sleeve before the tunnel. That one test changes the whole investigation.
- Too little heat and too much heat can both leave buckled film. Raising the tunnel temperature is a hypothesis, not a default.
- Separate film from machine by swapping one variable at a time. Use a second lot on the same settings, or the same lot on a second line.
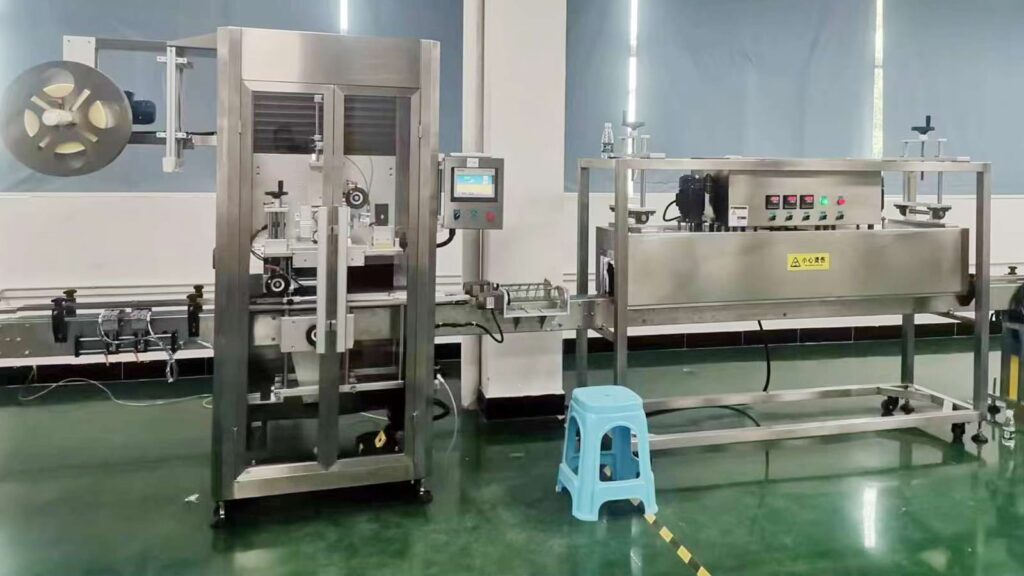
What Should an Acceptable Shrink Sleeve Result Look Like?
Before any defect can be named, the pass condition has to exist in writing. Too often the acceptance standard is an artwork proof plus a gut feeling about the sample bottle. That is why troubleshooting conversations go round in circles. Six properties are worth specifying, each measured against a fixed feature on the container.
Coverage: where the top and bottom edges land relative to the neck finish, the body, and the base flare, with a tolerance in millimeters. Orientation: where the graphic panel or seam sits on a round bottle, or how square it is to a flat panel. Finish: whether the film conforms in the zones you care about, with acceptable witness lines stated rather than debated. Cut quality: square edges without fiber tails, and no splitting at the fold. Container condition: no distortion, scorch, or trapped moisture. Repeatability: the same result across a run, across a film lot change, and after a changeover.
Then fix the inspection condition, because most arguments about appearance are arguments about lighting. Agree the lamp, the viewing distance, the angle, and how many consecutive containers to check. Our shrink sleeve machine buying guide covers what to state before a trial. That same document should carry the pass criteria. A machine accepted on a demonstration sample has no acceptance record behind it. A defect outside the range is a finding; one inside it is a preference.
What Can Cause Wrinkles and Uneven Shrinkage?
A sleeve shrinks by different amounts along its two axes: machine direction runs along the web and becomes sleeve height, transverse direction wraps the circumference. ASTM D2732 measures that unrestrained linear thermal shrinkage, and ASTM D1204 measures linear dimensional change of nonrigid film at elevated temperature in an air oven. A wrinkle appears where the shrink available in one axis does not match what the geometry demands, and the causes sit in five groups.
Film: the two-axis balance of the grade, its gauge, and lot-to-lot variation in the internal strain introduced during processing—which is what D1204 was written to indicate. Conversion: cut length, lay-flat width, and seam position. Applicator: whether the mandrel opens the sleeve fully, whether the crease is set sharply, and whether the web is stretched before it is cut. Tunnel: heat distribution across the chamber, dwell, and air or steam movement. Contenitore: wall thickness, embossing, undercuts, arrival temperature, and residual moisture on the surface.
Tengzhuo’s shrink sleeve category page attributes wrinkles and bubbling to uneven temperature distribution in basic tunnels. It offers multi-zone steam distribution and electric heat control as the remedy. Treat that as a design claim to test on your own bottles. Zoning changes how heat is distributed, not how far your film can shrink.
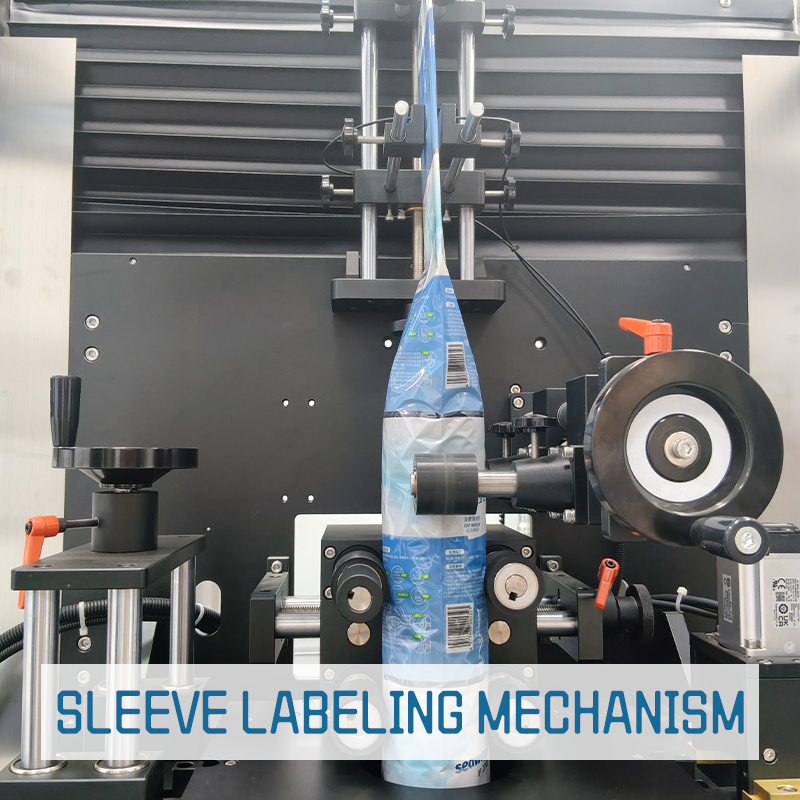
The most useful discriminator costs nothing: mark the sleeve before it enters the tunnel. Draw a fine line across the fold onto the container, or photograph the unit at the applicator outlet. If the wrinkle is already there before the heat, it is a placement or sizing problem. More tunnel energy will not remove it. A sleeve that leaves the applicator square and clean is being folded by shrink behavior. That makes it a question of distribution, film balance, or geometry. Skipping this step is how a line spends a week chasing a film problem that was a mandrel problem.
Why Do Graphics Twist or Move Out of Position?
Position defects come in two families: applied in the wrong place, or applied correctly and then moved. The pre-tunnel mark separates them—aligned marks point upstream, separated marks mean the sleeve travelled.
Registration at the cutter covers several things. The eye reads a printed color mark, then timing separates that read from the cut, then a sensitivity setting matters when artwork changes. Cut length, web tension, and sleeve orientation on the mandrel sit upstream too. Tengzhuo’s page describes high-frequency sensors reading color marks so the sleeve is cut and applied at a target height. It cannot say how your print stack and varnish affect mark contrast. Film pulled hard in the feed also recovers later. ASTM D882, the tensile method for thin plastic sheeting, is behind that behavior. Elongation has a memory, and heat releases it.
Downstream causes are about grip and geometry. A bottle can rotate between the applicator outlet and the tunnel inlet, carrying the sleeve with it. That usually traces back to conveyor guides, spacing, starwheel timing, or a container too light for the guide height. Static charge can hold a sleeve off-center as it transfers. On flat-sided bottles, uneven shrink between the axes pulls panels out of square. The graphic then looks rotated even though nothing moved. A flat panel is the hardest place to hide a two-axis imbalance. Separate systematic from random first. A constant offset points at setup and timing. A scatter in both directions points at feeding, static, conveying, or lot variation.
What Can Cause Sleeve Jams and Feeding Problems?
Feeding faults are easy to see but easy to misattribute. The machine stops where the symptom appears, not where the cause started. Work the path in order: reel, cutter, mandrel, transfer, sensor.
At the reel, telescoped rolls, uneven winding, splices, and a core slipping on the shaft all change web tension mid-run. At the cutter, blade wear and ink or adhesive build-up give crooked cuts and fiber tails. Tengzhuo’s page calls these “hairy” cutting edges. A slightly long cut overlaps into the next sleeve’s space. Tengzhuo attributes such faults to slippage in single-drive feeding and offers dual-drive synchronized feeding as its answer. That is a supplier position, so judge it by counting your own rejects. At the mandrel, the wrong diameter for the label, a scored surface, or a crease that will not open fully gives half-folded sleeves. At transfer, guides set too close, a bottle arriving early or late, and static at the mandrel outlet give misses and crushes. At the sensor, a lens coated in film dust or a change in artwork contrast reads as a phantom mark.
| What you see | Cause groups | Evidence to collect first |
|---|---|---|
| Wrinkles or bridging on a curve | Shrink balance, cut length, mandrel opening, heat distribution, container geometry | Photos before and after the tunnel on the same bottle; film lot and data sheet |
| Graphic off-center or skewed | Mark registration, cut timing, web tension, sleeve orientation, bottle rotation, panel ovalization | Whether the offset is constant or scattered; whether a pre-tunnel mark stays aligned |
| Sleeve rotates on the bottle | Conveyor guides and spacing, starwheel timing, light containers, static, low grip before shrink | Video at the applicator outlet and tunnel inlet; reject rate over a fixed count |
| Jams at the feeder or mandrel | Web tension and splices, blade wear, wrong or scored mandrel, sensor contrast, transfer timing | Where in the cycle it jams; whether it repeats at a fixed interval or follows a new roll |
| Splitting, haze, or a distorted bottle | Excess shrink energy, long dwell, thin walls, trapped air, heaters close to the web path | Which face shows it; whether the film is tight and broken or loose and foldable |
How Can Excess Heat Affect the Sleeve or Container?
Heat is the least forgiving variable on a sleeving line because it acts on film, container, and product at once. On the film, too much shrink energy pulls the sleeve past what the geometry accepts. The bottom seam splits, the lay-flat crease telegraphs through as a visible line, and gloss drops or the surface hazes. Printed colors shift, and a perforated band can tear along its line before anyone intends it. On the container, thin walls and shoulders distort, and bases push out from expanding trapped air. Residual stress left in the film can lift an edge later in distribution. Steam adds its own signature: marks or moisture trapped under the sleeve.
The trap is that under-shrink and over-shrink look similar on a curved bottle. Insufficient energy leaves loose film bridging across a feature. Excessive energy shrinks the film so far that it buckles against a shape it has already passed. Test a reject with a fingertip: loose and foldable points one way, tight and shiny the other. Then compare the tunnel families fairly. Our breakdown of steam versus electric shrink tunnels sets out the trade-offs, including the boiler question and the moisture-sensitive case.
A caution about lab figures: D1204 and D2732 heat by different media, and the standards note that an air-oven result is not interchangeable with a liquid-bath one. Ask for the grade’s figures in both directions, by the named method.
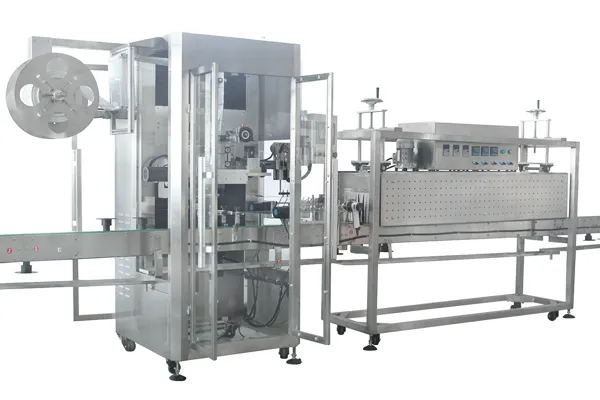
What Should Be Checked Before Any Setting Is Changed?
Change nothing until the baseline is frozen. Write down every current value on both units: cut length, tooling part numbers, the recipe recalled at the panel, guide positions, tunnel zone settings, and line speed. Then photograph a passing unit beside a failing one under the agreed inspection condition. Without that snapshot a fix cannot be credited to anything, and the next shift cannot reproduce your result.
Then rule things out from the cheapest to the most disruptive. Containers first: measure the lot against the drawing, since neck and body variation moves coverage and grip. Film second: compare the roll certificate with the grade you bought. Run a second lot at unchanged settings. If the defect follows the roll, the machine is being blamed for a supply change. Wear third: blades, mandrel surface, guides, suction pads, sensor lenses, adhesive build-up. Tooling fourth: confirm the recipe matches the hardware fitted, a common cause after a changeover.
Only then change a setting, one at a time, with a defined retest quantity and a written result. Be honest about the limit of that method. Interactions are real, and a fault that depends on two variables at once will not yield to single changes. The NIST/SEMATECH e-Handbook section on full factorial designs describes the alternative. Every setting of every factor appears with every setting of every other, but it becomes inefficient beyond roughly four or five factors. The practical middle ground is to test the two settings that plausibly interact together, deliberately, rather than by accident. Our guide to testing machine accuracy before production covers the same record-keeping discipline on the filling side.
| Step | What it rules out | What to record |
|---|---|---|
| 1. Freeze the baseline | Nothing—it makes every later step interpretable. | All settings on both units, tooling numbers, recipe name, time, shift. |
| 2. Confirm the defect | Preference: is it outside the agreed tolerance at all? | Reject count over a fixed number of containers, at the agreed lighting. |
| 3. Check containers and film lots | Supply-side variation in bottles, closures, and reel quality. | Measured dimensions against the drawing, roll and lot numbers, certificate values. |
| 4. Inspect wear and tooling | Blade condition, mandrel damage, guides, sensors, recipe-versus-hardware mismatch. | Photos of worn parts, last blade change, mandrel diameter fitted. |
| 5. Change one variable, retest | Single-cause settings faults—and, where two interact, one planned combination. | Old value, new value, retest quantity, and the reject count that followed. |
Tengzhuo builds the equipment discussed here, so supplier statements are claims to verify on your own line, not measured results. No temperature, steam pressure, dwell, or line speed is given, because those values belong to a specific film grade, container, and machine.

Domande frequenti
Is a higher tunnel temperature the fix for wrinkles?
Not by itself, and sometimes the opposite. If the wrinkle exists before the heat, it is a placement, sizing, or mandrel problem. Extra energy will not remove it. If the film is already tight and shiny, more heat can shrink it past what the shape accepts. That buckles the surface or splits the seam. Establish whether the film is loose or over-tensioned first.
Why does the sleeve rotate on the bottle?
Because something turns the container or the sleeve after landing. The usual suspects are conveyor guides and spacing, starwheel timing, a light bottle that is not restrained, static, and a neck or body region too smooth to grip before shrink. Mark sleeve and bottle together before the tunnel and check at the outlet. That tells you whether rotation happened before or after heat.
Can static electricity cause film-feeding problems?
Yes. Film separated from a reel and pulled over rollers builds a charge. Charged sleeves cling to each other at the mandrel outlet, to the guides, and to the bottle. That produces double feeds, mis-positioned labels, and jams that look random. Note whether the problem worsens in dry air or after a change of film supplier.
How can buyers tell a film problem from a machine problem?
Swap one thing at a time and keep the settings fixed. Run a second film lot through the same machine without touching anything. If the defect changes with the lot, supply is the variable. Run the suspect lot through another line or an earlier accepted setup. If it behaves there, look at the machine. Also check whether the fault follows the reel. A fixed repeat distance points to a roll or blade, while both web edges point to opening or distribution.
What evidence should go into a supplier troubleshooting request?
Six items. Start with photos or short video of a passing and a failing unit under stated lighting, plus the defect rate over a fixed container count. Add a snapshot of every machine setting including the tunnel zones, and the film grade with its lot number and data sheet. Finish with the container drawing with your measured dimensions, and a note of what changed the day the problem started. Add physical samples of both, and a remote conversation becomes a diagnosis.
Sleeve defects are rarely mysterious; they are usually mis-attributed. Write down what acceptable means and mark the unit before the tunnel. Separate the film question from the machine question with one swap at a time, and record the settings on both units. Do that and the cause is normally obvious—and when it is not, you already hold the evidence pack an engineer needs.

Continua a leggere
Scopri ulteriori approfondimenti dai nostri esperti di macchinari per l'imballaggio
Wrap-Around, Front-and-Back, and Flat-Surface Labeling Compared
Pressure-sensitive labeling splits by how the container moves and where the label datum sits. Compare the three methods, then send the samples a quotation needs.
Leggi l'articolo
How Powder Flowability Affects Auger Filling
Air trapped between particles is why powders bridge, compact, and segregate. How flowability drives auger selection, testing, and what to send with an enquiry.
Leggi l'articolo
Filling High-Viscosity Products with Particles: Methods and Trial Requirements
Viscosity, temperatura, and particles decide the filling method, not the catalogue. How to weigh piston and pump routes, plan cleaning, and run a real product trial.
Leggi l'articoloPronti per aggiornare la vostra linea di confezionamento?
Mettiti in contatto con i nostri ingegneri per una consulenza gratuita e una proposta di attrezzatura su misura all'interno 24 ore.
Ottieni un progetto di layout di linea CAD 3D gratuito
- Prezzi diretti in fabbrica
- Tempi di consegna rapidi
- Componenti globali di alto livello
- Supporto post-vendita dedicato


